What a day, I really want to start my new PC case project, but I'm lacking the creative juices yesterday and for today. I already had the idea and the design in my head, but I feel like there's something holding me back. Maybe because I'm just pressured for my wedding next year.
By the way, my CPU cooler (DeepCool IceBerg Pro) already showing some whining sounds, maybe I should go purchase a new one. My replacement CPU cooler maybe the DeepCool IceEdge 400 NI (92mm Fan), or the DeepCool GamerStorm, but this have a fan of 120mm and maybe a tight squeeze inside my case or it will not fit at all.
Decisions, decisions, decisions...
Sunday, December 12, 2010
Tuesday, December 7, 2010
Lesson's Learned No. 1
Always take down all the parts you've disassembled, why it is there, how it was put there, just note everything down and never play around too long with ribbon cables.
I just experienced this lesson the hard way, again. I'm trying to format a very old laptop, the Sony vaio PCG-FXA32. First thing happened is that the CD Rom Drive is not working, so I grabbed my external CD/DVD combo drive and swap it with the laptop, and it works. But before I could swap the drives, I have to remove the front cover that is on top of the keyboard. When I pulled it out, there's this plastic ribbon cable that is rather small. While I was doing the swap, I didn't noticed that I was already stressing the cable too much. And when I finally finished all the installation of the softwares and swaped back the old drive. The laptop won't turn-on now.
So I suspected early on that it was the ribbon cable, because the ribbon cable caters the power button. So I decided to try to fix it up by using some jumper wires because it only affected just a pin. But then again, I stressed the cable again and all the pins are now damaged.
This is supposed to be a simple laptop reformat. Haii... Going on the repairs, I accidentally mixed up and messed up the connectors, I think I must have soldered some pins together so the power button is practically useless now. I tried every combination but the damn laptop won't cooperate with me.
And since the connector pins are so tiny for my bulky soldering iron, I nearly spent a whole day just to fix the damn power button. And when I'm finally cleaning-up the repairs. Guess what, the power adapter now gave way. But luckily there is a spare power adapter from the last laptop I tried to repair, the ASUS one (I never really fixed the keyboard thing, because it is already faulty and fixing it will be ridiculously intensive, but I did fixed the hinge and the softwares are working perfectly, hehe).
And finally got the laptop to power up and all of the softwares are all working perfectly. But there's a catch, since I messed up the power button, once you plug the power to the laptop, it will power-on automatically without pushing any button. And when you shut the laptop down, it will power-up again automatically without pushing any buttons, so you have to pull the power cord immediately.
I'll just have to fix the cursed Jurassic laptop some other time.
Now the lesson is that to always take note all the parts before dismantling it and you must be very careful when you're handling ribbon cables, they can easily snap, don't bend them too much or flex them too much. It is not as flexible as it looks. Maybe that's why a hate slider phones, hahahaha.
I'll post some pictures soon.
Wednesday, November 24, 2010
My Tools of the Trade
In PC case modding there's a lot of tools that you will need to get the job done right, but you won't need a whole machine shop to start this hobby. The tools below are what I have and basically what you'll need. If you're also planning some D.I.Y electronics for your PC case, you also need some basic tools.
But before acquiring the tools below, I'll list some of the safety gears that you will most likely need. Most of these are protections from flying debris or cutting yourself up while using the power tools.
1. Arm protection (just a piece of cloth to cover the arms will do).
2. Gloves (the cotton ones, not the rubber)
3. Eye protection (eye glasses or poly-carbonate protective glasses)
4. Thick clothing (you don't want those debris flying at your limbs right?)
5. A face mask or gas mask. (because cutting metals or plastics produce a lot of fumes that's
not good to your lungs).
not good to your lungs).
Now, on to the tools.
Rotary Tool:
This is tool is very different, in terms of function, from your hand-held drill. First of all, a rotary tool is a high-speed, low-torque power tool used to cut thin sheets of metals. Unlike a hand-held drill which is used to... drill holes, it is low-speed and high-torque power tool.

Pic 1: J.C. Kawasaki Rotary Tool set
High-speed - Low-torque means that you can't put on pressure on this tools because it is not designed to. If you tried to put on pressure on this tools (while you're cutting), it will most likely to get stuck and burn the coils in your tool or the rotary disc will break/snap and throw the debris at you, or worse, at your eyes. Unlike your hand-held drill (Low-speed - High-torque), you can press or add pressure on it all you want but it won't spin fast unlike the rotary tool.
In a rotary tool, you will also need some ammunition. They are the cutting discs, diamond cutting discs, and a Flexible Shaft. The cutting discs are like "haw flakes", they can easily snap, and is mainly used to cut thin sheets of metal only. Those discs wear out easily, so make sure you have enough of them. The diamond cutting discs is used mainly in cutting plastics only because the disc is made of a very thin metal and won't stand a chance with a sheet of metal no matter how thin it is. Why use a diamond cutting disc rather than the "haw flakes"? Well, one is for precision cutting, plastics melt easily and since the rotary tool is a high-speed tool, it will just melt the plastic instead of cutting. So it is recommended to put the rotary tool at low-speed when cutting plastics. And because the diamond cutting disc is thin, it will only eat away a small portion of plastic, unlike the "haw flakes". The Flexible shaft is a long piece of hose that you connect to the rotary tool. You'll use this for precision cutting because it will give you more hand control because you're only holding the end of the shaft. Whereas if you don't use the shaft, your hand or hands will focus on maintaining the position of the rotary tool while cutting, and that can bring strain to your arms and affect the precision of your cutting.
Take note also that the rotary tool can accept drill bits also, just a caution when drilling that do not put too much pressure. My motto in using the power tools: "Don't let the tool work you out, let the tool work for you."
Take note also that the rotary tool can accept drill bits also, just a caution when drilling that do not put too much pressure. My motto in using the power tools: "Don't let the tool work you out, let the tool work for you."
Hand-held Drill:
These hand-held drills will mostly be used to drill holes for screws, so a simple high-torque hand-held drill will be enough. There are many variations of these drills, you may have a cordless drill, and the like. I don't have these tool, I just borrowing this from my uncle. :)
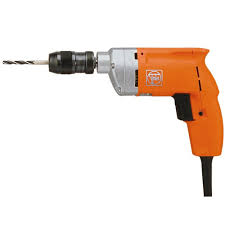
Pic 2: Hand-held drill.
C-Clamps:
C-Clamps are used to hold things down while you're working on it, specially if you're working with power tools, you don't the materials you're working on fly around you right? If you don't have any C-Clamps just make sure you hold them down firmly. You can also use any kind of clamps to hold down the piece you're working on.

C-Clamps are used to hold things down while you're working on it, specially if you're working with power tools, you don't the materials you're working on fly around you right? If you don't have any C-Clamps just make sure you hold them down firmly. You can also use any kind of clamps to hold down the piece you're working on.

Pic 3: C-clamps
Needle Files:
This tool grinds the material, or files the material, making the edges sharp or rounded depending on your need. What I have are needle files for plastics only, you can't use this on metals because you'll just scrape off the rough surface of the files. But there are needle files that are used on metals of sheets. So grab the right one you'll need. There are many different shapes, there are flat, half flat half rounded, rounded, triangular, square, and many more.


Pic 4: Needle Files
Bastard File:
The bastard file is the BIG brother of those needle files, and when I say BIG it is BIG compared to the needle files thus acquiring the name Bastard. It is mainly used on metals, but you could also use those on plastics, the difference is that the bastard file grinds more materials and are big. So you use this when you're grinding down a large piece of material, after grinding to the desired shape, you'll then use the needle files for a smoother grind. You can even use a sandpaper for finer grind and for finishing touches. Shown below are bastard files with different grades, from fine to rough. This tools can come also as flat on both sides, or half flat or half rounded. So I would recommend the half-rounded one for more flexibility of the tool.

The bastard file is the BIG brother of those needle files, and when I say BIG it is BIG compared to the needle files thus acquiring the name Bastard. It is mainly used on metals, but you could also use those on plastics, the difference is that the bastard file grinds more materials and are big. So you use this when you're grinding down a large piece of material, after grinding to the desired shape, you'll then use the needle files for a smoother grind. You can even use a sandpaper for finer grind and for finishing touches. Shown below are bastard files with different grades, from fine to rough. This tools can come also as flat on both sides, or half flat or half rounded. So I would recommend the half-rounded one for more flexibility of the tool.
Pic 5: Bastard File.
Allen-Head Screw Drivers:
Well, this may not be a necessity, but it is always to have this tools because you'll never know when you'll need this. It is used on Allen-head screws. It is different from your average Philips screw driver and the Flat-head screw drivers. The Allen-head had a shape of a Hexagon (polygon that has six sides).


Pic 6: Allen-head screw drivers.
Pic 7: Allen-head screws.
Acrylic Cutter:
This tool does not actually cuts the Acrylic sheets, it actually scores it. Score means making a groove on the material. By scoring the Acrylic sheet, you're making a line and makes the thickness of the sheet thin, thin enough that you could actually snap it into two. This is useful if you're cutting long pieces of Acrylic sheets. When snapping Acrylic sheets, make sure you back it up on a hard surface and put the scored part on the edge and use your karate chop. :)


Pic 8: Acrylic Cutter
Acrylic Bender:
This one, well, bends Acrylic sheets. It is basically composed of a heating element (usually nichrome wires usually found on hair-driers) that is stretched. In bending Acrylic materials, you must heat only the side that will expand if you bend it. But if the Acrylic material is more than 3mm thick, it is recommended to heat both sides of the material. This is very useful in bending big pieces of materials. I don't have this tool because I only bend small pieces of Acrylics only, so I'm just using a lighter or a Hair-drier. In using the lighter, just don't overdo it or you'll end up deforming the material or burn it. The technique is to sway the flame to the length you're bending. Don't keep the flame on one part, but don't sway too fast, that it won't heat enough. :)


Pic 9: Acrylic Bender.
Pic 10: D.I.Y. Acrylic Bender.
Sandpapers:
I think we're all familiar with this one, but take note the grit of the sandpaper, the grit is the measure of roughness. High grit sandpapers have very fine roughness. These are used for finishing the material. For low grit sandpapers, the roughness and the size of the abrasives are larger, good for sanding down huge amount of materials. My tip is that when you're sanding down a huge piece of material, for example plastic, use a low-grit first, a 200 or 300 grit will do. When you're already sanded it down to your likeness, use a high-grit sandpaper (about 800 to 2000 grits) to finish it.
We usually sand down the materials in preparation for painting, because you want a very flat and smooth material before applying a paint, to achieve a near mirror-finish paint.
Pencil and Ruler:
Hmmm... Well, you get the idea. Hehehe.
NOTE: The tools above is what you'll definitely need to get the job done right. But If you're missing a few tools, you can just improvise and use you're resourcefulness.
Hmmm... Well, you get the idea. Hehehe.
NOTE: The tools above is what you'll definitely need to get the job done right. But If you're missing a few tools, you can just improvise and use you're resourcefulness.
My next post will be the tools you need when you're dealing with electronics/electrical mods.
Wednesday, November 17, 2010
PC Case Modding
Case Modding is coined from the term modification wherein you modify the chassis of your computer in a non-standard way. Non-standard way meaning that those modifications is not normally seen on retail stores. Case modding can also be applied on gaming consoles like the XBOX, Playstation, etc.. (you name it).
There are many reasons why case modding is done to a chassis, and these are what I think:
1. To show off the internals of the PC. Most of the cases sold today are alike a huge metal box, and it can be quite boring. The modifications that can be done is to cut a huge hole on the side (or in any part of the case) and replace it with a transparent Acrylic glass so that you view the inside and marvel the hardware inside.
2. For aesthetics purposes. You'll literally change the way on how you see your PC case. One way to do this is to do paint, decorate, or apply Air Brush designs for that eye catching looks.
3. For performance. One of the things that is usually neglected by PC owners is the heat generated by your PC, and as we know, exposing any hardware in high temperatures will degrade the quality and performance of the components and eventually shorten its lifespan. You can improve this by cutting holes (also known as Blow Hole) wherein you'll install extra Chassis Fans to remove the Hot Air and/or add an extra Chassis Fan to act as an intake fan to push the cold and fresh air outside into your Chassis.
Based from those reasons above, we now came-up with the types of modding.
1. The most common type of Case Modding is Window Mods. These type of mod involved replacing the left or the right panels of the case (sometimes the top panel also) is replaced with an Acrylic Glass so that the internals are viewable. This became very common that some of the manufacturers now offer some cases that has windows already installed. There are some cases that is made up of entirely of transparent Acrylic Glass so that you can view the insides 360 degrees. Below are some samples of Window Mods, the 2nd picture has window mod on the left and top panels (this 1st case looks familiar, hmmmm, let's move on).

2. Lighting Mods. Are you into disco? Not really, hehehe. Well, in this mod you install what we normally call a CCFL tubes (Cold-Cathode Fluorescent Light) or an Array of LEDs. The CCFL is not your common household Fluorescent lights because it produces a lot heat and you may toast your hardware. Cold-Cathode means, well... Cold, it produce heat but not too much heat. The LED lights are most common now a days because it is small and energy efficient than CCFLs. Also, this mod is usually accompanied by the Window mod.

3. Cooling Mods. There are many mods that falls into this category. This mod is aimed to improve the airflow (or better circulation of air) inside the case. Mostly this involves drilling a new mount for the extra fans to assist in taking-in or exhausting of air. These are done mostly of overclockers to help their PC breath efficiently. Overclocking means setting-up your PC to run at higher levels compared to the factory settings of the components, and this extra performance produces also extra amount of heat. One mod that is under this category is water cooling mod, wherein you replace the fan that cools the components (CPU or Video Card) with a set of water block and a radiator, just like a car, hehehe. The first picture is a liquid-cooled PC, wherein you have a pump to push water to the CPU and Video card, a reservoir, and a radiator (hidden). The second picture is composed basically of fans, it's an overkill i know, but you get the point, hehehe (maybe there's a hurricane inside).

4. Painting Mods. This is my favorite part wherein you paint the components like the keyboard, monitor, mouse, or even the whole case depending on your design. There are many ways to paint the components, by spray painting, using automotive paints, or by powder coating. You can also incorporate an Air Brush design. The first picture shows a painted keyboard (red part), and the second pictures shows a painted case wherein it is mirror-finished just like a show car (most cases that are available in retail are painted dull or in matte finish).

5. Case Building Mod. In this mod you are building your case from the ground-up or from scratch. You can use an existing case designs or build a radical case. You can base your design from a microwave, a wheel, or even a barrel. This is the most difficult type of mod, because you must carefully design the placement of the components. I could consider the Component Mod under this category, because the component mod may involve the relocation of components, example is relocating the Power and Reset buttons, relocating the Hard Disk Drives, etc... Now the pictures below are some of the great mods. The first is a mod wherein it looks like V-twin engine which literally contains 2 physical PCs. The 3rd pictures looks like a telephone booth or something.

Is replacing an old component with a new or updated one is considered a mod? Well, actually no, that is only an upgrade, and this question will sometimes engaged you in a long fight in forums. As for me, upgrading components is NOT a mod, period!
Saturday, November 13, 2010
ASUS A8Fm Notebook Repair
My tito just came home today and brought a supposedly broken ASUS A8Fm laptop/notebook, i think it is already 4 years old. But upon checking it, it still boots up to Windows XP. I just told my tito to backup the files and do a clean install of the OS.


Well, I opened the HDD cover, and found it is a 2.5" Seagate Momentus 80GB SATA Drive. I'm too lazy to open my desktop just to hook the Laptop Hard Drive and the external 2.5" HDD enclosure that I have for Laptop Hard Drives are for PATA only (also known as IDE). Luckily I have an External HDD Enclosure for 3.5" HDDs. I think it will be enough since the SATA Data and Power Connectors are the same.
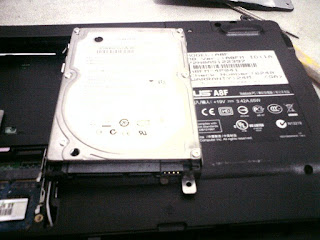

Pic 2: 2.5" Seagate Momentus 80GB SATAII
I'm planning to repair also one of the the Hinges of the laptop because it is already loose and the LCD screen is wobbling badly, but it has to wait because I will visit my fiance at their home after lunch. I'll try to post the work logs here maybe tonight (can't wait to work on it, hahaha).
One thing to remember when doing a reformat or clean install on a PC or laptop. Make sure you backup all the data first and you have a copy of the Drivers that comes with the laptop or PC. If the Drivers CD is already lost, download them on the manufacturer's site.
Most of the laptops that I encounter, the drivers and the OS are already built-in to the hard drive, so whenever you chose to reformat the laptop, the laptop will automatically install the OS and the drivers for you. So you if you ever lost the driver CD for the laptop, it's not really a big deal. But don't lose the Driver CD in the first place, you'll never know when you'll need it. :)
Update (Nov. 15, 2010):
For the ASUS A8Fm laptop, the OS and the drivers are not included in the hard disk, but fortunately, I already downloaded it (380MB all in all).

Pic 4: Damaged Hinge.

Pic 5: LCD Disassembly (LCD screws exposed).
You will notice that there are rubber pads located along the side of the LCDs. Remove those rubber pads with any pointy thing, jsut don't overdo it or you'll leave a scratch.

Pic 6: LCD Disassembly (Crack-open the front LCD bezel).
To remove the front LCD bezel or cover, pry it open with a hard plastic, I usually use a guitar pick or an old credit card. You can even use your flat head precision screw driver just be careful or you might end up leaving scratches or dents .


Pic 7: LCD Disassembly (Front LCD bezel removed).
Now, we've removed the bezel, we can now estimate the damage. Fortunately, the hinge screws just came loose with the base and to the LCD frame. We'll just have to re-align the hinge and screw them back into place.


Pic 8: LCD Disassembly (Broken Hinge).

Pic 9: LCD Disassembly (Hinge fixed).
Reverse the process that we've done and we're set to go to install the OS and the drivers.While I was installing the OS and the softwares, I found out that some of the keyboard keys are not working, I just grabbed my spare keyboard just get the softwares installed. Looks like my plan of overhauling the laptop will go after all.
To start the off, turn the laptop upside down for us to see where are the screws located. Basically, you must remove all the screws that you can find. You'll also need some tools like the ones below. They precision Flat Head Screw Drivers and they can be bought in any hardware stores.

Pic 10: Flat Head Precision Screw Drivers
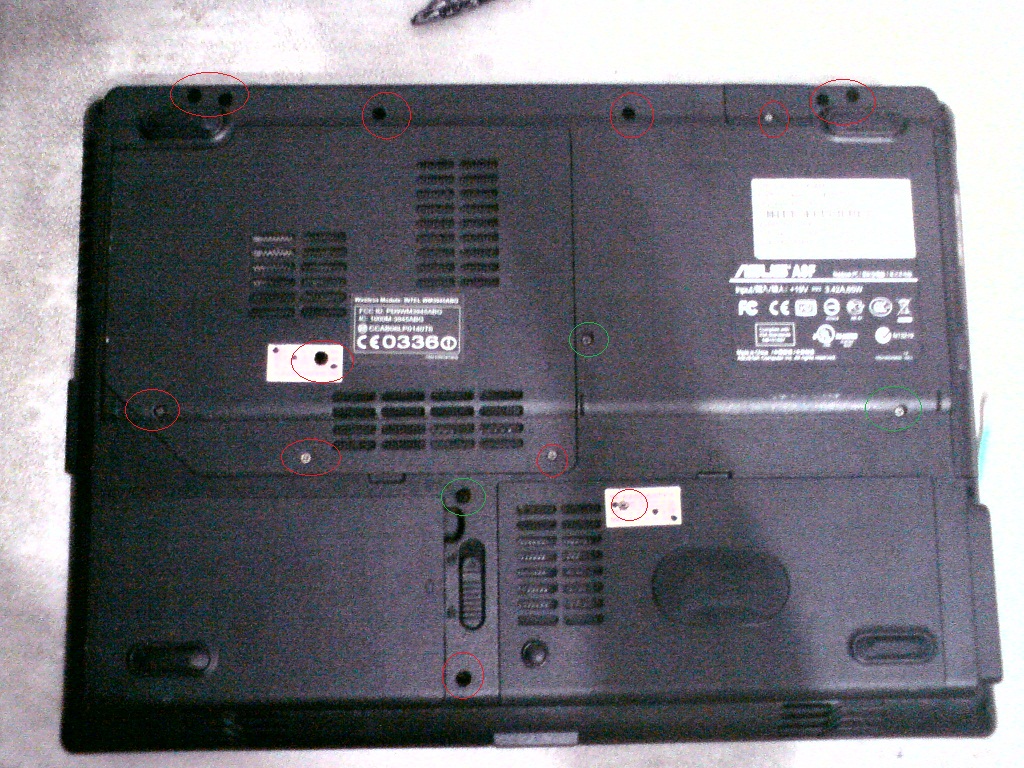
Pic 11: Underside of the Laptop
Next, turn the laptop upside up again to remove the keyboard because there are screws underneath it. There are hooks on the top of the keyboard and you just have to press them down to release the keyboard. Next don't pull it out yet, you must slide the whole keyboard upwards and gently because you don't want to rip the ribbon cables. After fully unhooking the keyboard, gently pull down the locks on the ribbon cable of the keyboard (the white part). To put it back again, just slide the ribbon cable to the slot and push the white lock so that it will sandwich the ribbon.

Pic 12: Keyboard Ribbon Cable and connector

Pic 13: Screws under the keyboard
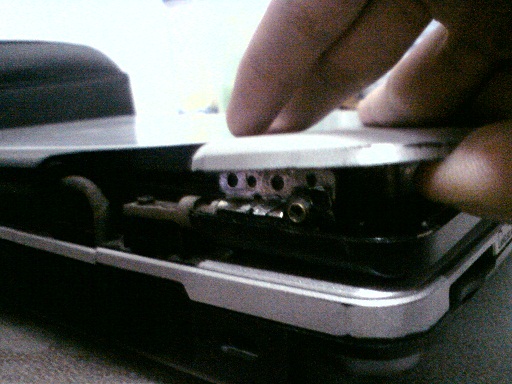
Almost ready to pry the top cover using again our trusty credit card, but we must remove also the ribbon cable of the touch pad and the Front bezel of the LCD again.
The touch pad ribbon cable will just get in the way when we open the cover. Just slide down the white part to release the cable just like what we did with the keyboard. Remember that the LCD has 2 cables running at the hinges? The cable on the right hinge is insanely short in such a way that it will be hard to pull the LCD out and remove the top cover.

Pic 14: Touch pad ribbon cable.

Pic 15: Right Hinge cables.
At last we can remove the top cover, but be cautious again that the cable at the right hinge is still too small to fully remove the top cover. I can't seem to find a way to release the cable and I'm already stressing the cables, so I just have to work on what I can. So while doing the repairs, why not remove the dust on the motherboard using a paint brush, not the water color brush :)

Pic 16: Top cover removed.
Also turn the laptop upside down again to clean the underside, specially the fan near the CPU.

Pic 17: CPU, Heat Sink Fan, and the RAM

Pic 18: Underside with all the covers removed. Bottom right side is the Hard Disk bay, to the left is the battery. Top right is where the screws of the CD ROM Drive, on the top middle is the RAM, and the left of it is the CPU and the CPU Heat Sink Fan.
After all the housekeeping is done, just reverse the process of what we've done and you're good to go. Just a note to tighten the screws near the hinges. You don't want them to be loose or else the plastic housing will be the one give way and it will be more difficult to repair, sometimes it is impossible.
You can now disassemble any laptop that you can get your hands on, but as a disclaimer, disassemble it at your own risk because you may void the warranty.
I hope this helps. Just e-mail me or post your comments if you need any help.
Friday, November 12, 2010
My Dream Machine
When I was still a child, I always dreamed of my own desktop PC. I already have Brick Game, Game 'n Watch, GameBoy, GameGear, Family Computer, SNES, SEGA, Playstation, and a Playstation 2, but never a desktop. In the old days, having a PC is a luxury and costs a fortune to have one and to maintain one. I always begged my parents to buy me one, I even bribed them that I will be on Top 5 on my Grade 6 graduation just buy me a PC as a reward, hahaha. But it didn't work.
I finally got my chance to buy one when I resigned to my first job, because of my Back Wage, haha. I have purchased my own new desktop just under 18,000.00. Below are the items I purchased on SM North Edsa at the new CyberZone.
Processor: AMD Athlon 64 X2 5000+ (Brisbane core, 2.6GHz)
Motherboard: ECS 6100PM-M2 (AM2 socket, micro-ATX form factor)
Memory: 1GB Kingston DDR2 800MHz (CL6)
Storage: 160GB Western Digital Caviar Blue (SATA II, 3Gb/sec)
Video Card: Palit 9500GT Super DDR2 512MB
Power Supply: HEC Raptor 500R (500 Watts, dual +12V rail)
Casing: Generic Neutron micro-ATX
I didn't purchase a monitor, because one my relative just happens one lying around at their house.
Soon after that, I started to think that my PC is ugly, and I mean ugly because my case was just a generic one (just 1,500.00 Php including the Power Supply). I started searching for alternatives how to make my PC to look good and perform well. And then I stumbled into a great Filipino site.
One in particular that really caught my eye is the thread, where it discusses the yips, how tos, and the techniques in case modding. It's like hitting a jackpot because the topic there is about PC Modding (I will talk about it more on my next post). Just to have an idea, PC modding is the way on how to change the physical appearance of your PC whether it is just for aesthetics or cooling performance of your PC.
The pictures below is my OLD PC, first is the internals, and the other is the exterior. (Looks crappy, isn't it?)

Pic 1: Interior.

Pic 2: Left Panel (Side View).

Pic 3: Front Panel (Front View).
And here is sneak peek at my new PC, it's still the same case, but now modified. I named my new Case as Neutron-Reborn v1. The pictures below are a bit old because I did some minor modifications to my new case.

Pic 4: Front View (repainted and relocated the buttons)

Pic 5: Right Side View (Installed Acrylic windows and repainted with Glossy Black).
And here are my new specs:
Processor: AMD Athlon II 250 (Overclocked from 3.0GHz to 3.3GHz)
Motherboard: MSI 880GMA-E45 (AM3 socket, micro-ATX form factor)
Memory: 2x2GB Team Elite DDR3 1333MHz (CL9)
Video Card: XFX ATi Radeon HD5770 1GB DDR5 (HD577X-ZNFC)
Hard Disk 1: 320GB Western Digital Caviar Blue (SATA II)
Hard Disk 2: 500GB Seagate Baracuda (SATA II)
Optical Drive: Lite-On DVD-RW (Double Layer, SATA)
Power Supply: CoolerMaster 750W GX Series
I will post too my work logs on how did I transformed my crappy old PC to a new PC.
The Brick Game
It all started when I was a Grade school (I think a 4th Grader), my mother bought me my first Brick Game console that is powered by four AA Batteries. My mother bought me one because I was top 5 in the class.
One day while I was mastering the Tetris and the Boxing Game, the batteries ran out of juice. I looked every inch of the house if I could salvage any batteries, but with no luck. I tried also pick pocketing some money in my dad's pants that is just hanged behind the door of their room. But unfortunately I didn't do it out of nowhere.
And then I noticed a hole on top of the console that something can be inserted to. I started to scourge some old wires at the backyard, or so to say our laundry area, because we usually put old stuffs and junks. So I grabbed a scissor, cut and stripped 2 wires of the same length. I was so excited because I'll be able to play again. I just slitted the 2 wires into the said hole in the console, and then I plugged it into AC wall socket.
As expected, I got electrocuted. Fortunately, the house nor the outlet didn't catch fire (lucky me). To my great surprise, the brick game didn't suffer any burn or damage. What's more amazing is that when someone gave me the batteries I needed (courtesy of my mother, after begging and crying), it suddenly came to life.
So from that moment on, I started to think why the brick game didn't broke, and what is the purpose of that hole on the top of the console (the hole was actually a 3.5mm Audio Jack). As soon I got my hands on a pair of screw driver, I started the dismantling madness on every piece of equipment I could laid my hands on to. Guess who is the first victim of my curious little hands? Of course, my beloved brick game. After some tinkering, the brick game finally gave-up. I didn't broke it because I smashed it to pieces, but rather because I couldn't get it to assemble again, Hahaha.
Subscribe to:
Posts (Atom)