In PC case modding there's a lot of tools that you will need to get the job done right, but you won't need a whole machine shop to start this hobby. The tools below are what I have and basically what you'll need. If you're also planning some D.I.Y electronics for your PC case, you also need some basic tools.
But before acquiring the tools below, I'll list some of the safety gears that you will most likely need. Most of these are protections from flying debris or cutting yourself up while using the power tools.
1. Arm protection (just a piece of cloth to cover the arms will do).
2. Gloves (the cotton ones, not the rubber)
3. Eye protection (eye glasses or poly-carbonate protective glasses)
4. Thick clothing (you don't want those debris flying at your limbs right?)
5. A face mask or gas mask. (because cutting metals or plastics produce a lot of fumes that's
not good to your lungs).
not good to your lungs).
Now, on to the tools.
Rotary Tool:
This is tool is very different, in terms of function, from your hand-held drill. First of all, a rotary tool is a high-speed, low-torque power tool used to cut thin sheets of metals. Unlike a hand-held drill which is used to... drill holes, it is low-speed and high-torque power tool.

Pic 1: J.C. Kawasaki Rotary Tool set
High-speed - Low-torque means that you can't put on pressure on this tools because it is not designed to. If you tried to put on pressure on this tools (while you're cutting), it will most likely to get stuck and burn the coils in your tool or the rotary disc will break/snap and throw the debris at you, or worse, at your eyes. Unlike your hand-held drill (Low-speed - High-torque), you can press or add pressure on it all you want but it won't spin fast unlike the rotary tool.
In a rotary tool, you will also need some ammunition. They are the cutting discs, diamond cutting discs, and a Flexible Shaft. The cutting discs are like "haw flakes", they can easily snap, and is mainly used to cut thin sheets of metal only. Those discs wear out easily, so make sure you have enough of them. The diamond cutting discs is used mainly in cutting plastics only because the disc is made of a very thin metal and won't stand a chance with a sheet of metal no matter how thin it is. Why use a diamond cutting disc rather than the "haw flakes"? Well, one is for precision cutting, plastics melt easily and since the rotary tool is a high-speed tool, it will just melt the plastic instead of cutting. So it is recommended to put the rotary tool at low-speed when cutting plastics. And because the diamond cutting disc is thin, it will only eat away a small portion of plastic, unlike the "haw flakes". The Flexible shaft is a long piece of hose that you connect to the rotary tool. You'll use this for precision cutting because it will give you more hand control because you're only holding the end of the shaft. Whereas if you don't use the shaft, your hand or hands will focus on maintaining the position of the rotary tool while cutting, and that can bring strain to your arms and affect the precision of your cutting.
Take note also that the rotary tool can accept drill bits also, just a caution when drilling that do not put too much pressure. My motto in using the power tools: "Don't let the tool work you out, let the tool work for you."
Take note also that the rotary tool can accept drill bits also, just a caution when drilling that do not put too much pressure. My motto in using the power tools: "Don't let the tool work you out, let the tool work for you."
Hand-held Drill:
These hand-held drills will mostly be used to drill holes for screws, so a simple high-torque hand-held drill will be enough. There are many variations of these drills, you may have a cordless drill, and the like. I don't have these tool, I just borrowing this from my uncle. :)
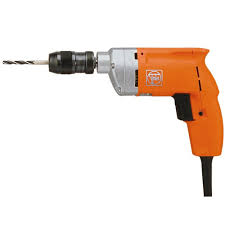
Pic 2: Hand-held drill.
C-Clamps:
C-Clamps are used to hold things down while you're working on it, specially if you're working with power tools, you don't the materials you're working on fly around you right? If you don't have any C-Clamps just make sure you hold them down firmly. You can also use any kind of clamps to hold down the piece you're working on.

C-Clamps are used to hold things down while you're working on it, specially if you're working with power tools, you don't the materials you're working on fly around you right? If you don't have any C-Clamps just make sure you hold them down firmly. You can also use any kind of clamps to hold down the piece you're working on.

Pic 3: C-clamps
Needle Files:
This tool grinds the material, or files the material, making the edges sharp or rounded depending on your need. What I have are needle files for plastics only, you can't use this on metals because you'll just scrape off the rough surface of the files. But there are needle files that are used on metals of sheets. So grab the right one you'll need. There are many different shapes, there are flat, half flat half rounded, rounded, triangular, square, and many more.


Pic 4: Needle Files
Bastard File:
The bastard file is the BIG brother of those needle files, and when I say BIG it is BIG compared to the needle files thus acquiring the name Bastard. It is mainly used on metals, but you could also use those on plastics, the difference is that the bastard file grinds more materials and are big. So you use this when you're grinding down a large piece of material, after grinding to the desired shape, you'll then use the needle files for a smoother grind. You can even use a sandpaper for finer grind and for finishing touches. Shown below are bastard files with different grades, from fine to rough. This tools can come also as flat on both sides, or half flat or half rounded. So I would recommend the half-rounded one for more flexibility of the tool.

The bastard file is the BIG brother of those needle files, and when I say BIG it is BIG compared to the needle files thus acquiring the name Bastard. It is mainly used on metals, but you could also use those on plastics, the difference is that the bastard file grinds more materials and are big. So you use this when you're grinding down a large piece of material, after grinding to the desired shape, you'll then use the needle files for a smoother grind. You can even use a sandpaper for finer grind and for finishing touches. Shown below are bastard files with different grades, from fine to rough. This tools can come also as flat on both sides, or half flat or half rounded. So I would recommend the half-rounded one for more flexibility of the tool.
Pic 5: Bastard File.
Allen-Head Screw Drivers:
Well, this may not be a necessity, but it is always to have this tools because you'll never know when you'll need this. It is used on Allen-head screws. It is different from your average Philips screw driver and the Flat-head screw drivers. The Allen-head had a shape of a Hexagon (polygon that has six sides).

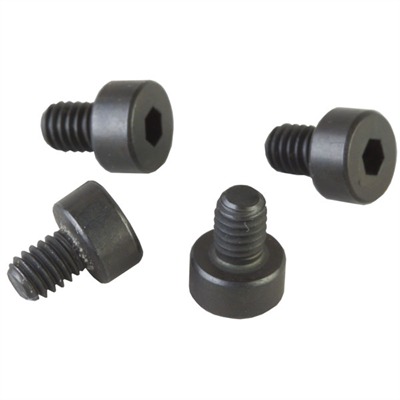

Pic 6: Allen-head screw drivers.
Pic 7: Allen-head screws.
Acrylic Cutter:
This tool does not actually cuts the Acrylic sheets, it actually scores it. Score means making a groove on the material. By scoring the Acrylic sheet, you're making a line and makes the thickness of the sheet thin, thin enough that you could actually snap it into two. This is useful if you're cutting long pieces of Acrylic sheets. When snapping Acrylic sheets, make sure you back it up on a hard surface and put the scored part on the edge and use your karate chop. :)


Pic 8: Acrylic Cutter
Acrylic Bender:
This one, well, bends Acrylic sheets. It is basically composed of a heating element (usually nichrome wires usually found on hair-driers) that is stretched. In bending Acrylic materials, you must heat only the side that will expand if you bend it. But if the Acrylic material is more than 3mm thick, it is recommended to heat both sides of the material. This is very useful in bending big pieces of materials. I don't have this tool because I only bend small pieces of Acrylics only, so I'm just using a lighter or a Hair-drier. In using the lighter, just don't overdo it or you'll end up deforming the material or burn it. The technique is to sway the flame to the length you're bending. Don't keep the flame on one part, but don't sway too fast, that it won't heat enough. :)


Pic 9: Acrylic Bender.
Pic 10: D.I.Y. Acrylic Bender.
Sandpapers:
I think we're all familiar with this one, but take note the grit of the sandpaper, the grit is the measure of roughness. High grit sandpapers have very fine roughness. These are used for finishing the material. For low grit sandpapers, the roughness and the size of the abrasives are larger, good for sanding down huge amount of materials. My tip is that when you're sanding down a huge piece of material, for example plastic, use a low-grit first, a 200 or 300 grit will do. When you're already sanded it down to your likeness, use a high-grit sandpaper (about 800 to 2000 grits) to finish it.
We usually sand down the materials in preparation for painting, because you want a very flat and smooth material before applying a paint, to achieve a near mirror-finish paint.
Pencil and Ruler:
Hmmm... Well, you get the idea. Hehehe.
NOTE: The tools above is what you'll definitely need to get the job done right. But If you're missing a few tools, you can just improvise and use you're resourcefulness.
Hmmm... Well, you get the idea. Hehehe.
NOTE: The tools above is what you'll definitely need to get the job done right. But If you're missing a few tools, you can just improvise and use you're resourcefulness.
My next post will be the tools you need when you're dealing with electronics/electrical mods.
No comments:
Post a Comment